How to Create Flow Charts in Excel Series
How to Add Text to an Excel Flow Chart Connector
(aka, Flow Line Arrow)
By Nicholas Hebb
To make a professional looking flow chart, it's sometimes nice to add in-line text to Connectors, as opposed to typical flow line annotations that sit in a bordered text box above the line. This article shows you how to annotate flow lines with a little more polish.
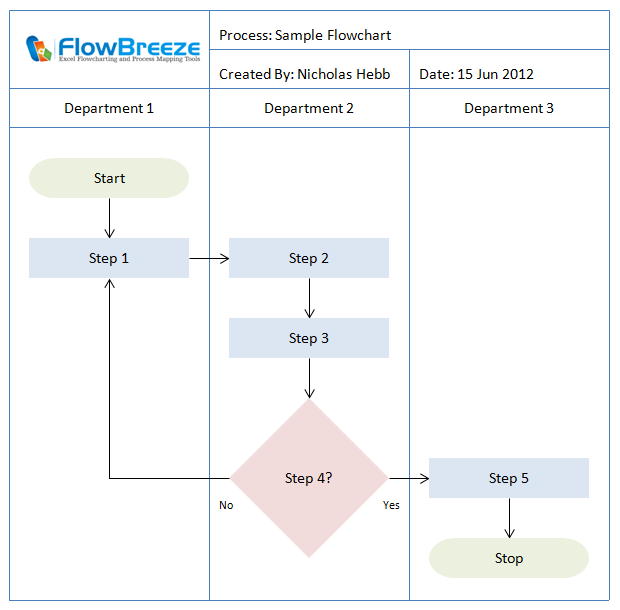
Excel Flowchart Wizard
FlowBreeze is a flowchart add-in for Microsoft Excel that makes creating flowcharts simple and pain free. Free 30-Day Trial.Add the Text Box to the Flow Chart
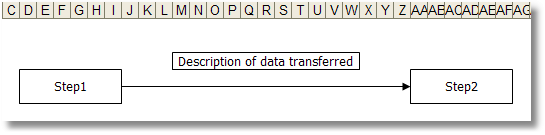
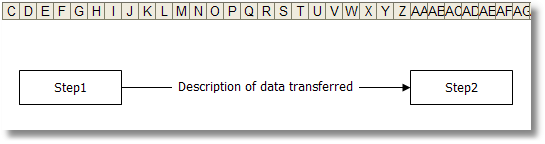
As the picture below shows, the first step is to add the a text box to the flow chart right above the flow line (aka, connector).
- Excel 2007 - 2019: Click the Insert tab from the ribbon, and then click the Shapes dropdown. Click the top left item in the gallery
 to insert the text box.
 - Excel 2000 - 2003: On the menu click View > Toolbars > Drawing to make the Drawing toolbar visible, and then click the Text Box button.
After clicking the Text Box button, use your left mouse button to click the worksheet and drag the mouse to size the new text box. Clicking the center of the text box will then allow you to enter the text.
Align Text Box Over Flow Chart Connector
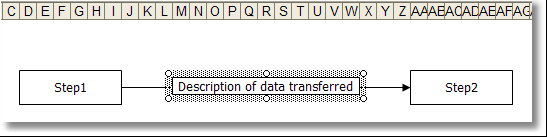
The next step is to align the text box over the flow chart connector. This can be done by selecting the text box and using the keyboard arrow keys to move the shape. If Snap to Grid is enabled, fine-tuned movements can be made by holding the Ctrl key down while pressing the arrow keys. The picture below shows the above text box moved on top of the flow chart connector.
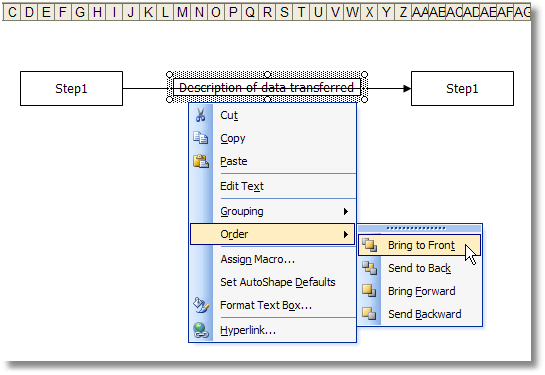
If you move the text box and the connector line is visible on top of the text box, then you need to bring the text box to front. To do this, right-click on the text box border and select Order > Bring to Front from the context menu as shown in the picture below.
Formatting the Text Box
Excel 2007 - 2010
To remove the border in Excel 2007 and 2010, click the text box, then click the Format tab on the Excel ribbon. Next, click the Shape Outline dropdown and select No Border from the menu.
Excel 2000 - 2003
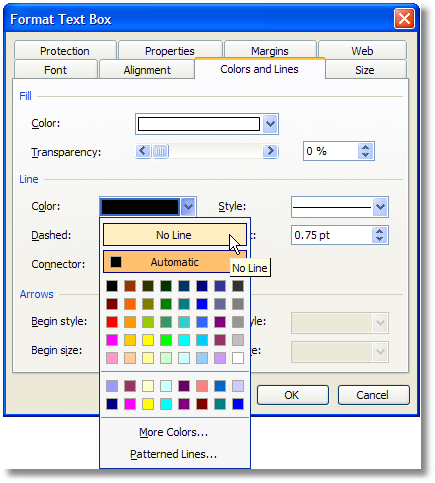
Excel's default text box formatting requires a few changes to make an annotated connector (flow line) look more polished. To change the formatting, double-click on the border of the text box to open the text Box Formatting dialog. On the Alignment tab, change both the horizontal and vertical text alignment to Centered. Also, you can use the Font tab to make the font match the rest of the flow chart, if needed. Lastly, removing the border makes the annotation look more professional. This is done on the Colors and Lines tab by changing the Line > Color to No Line as shown in the picture below.
After applying all these changes, the final appearance of the annotated flow chart connector example can be seen below:
About the Author
Nicholas Hebb
Nicholas Hebb is the owner and developer of BreezeTree Software, makers of FlowBreeze Flowchart Software, a text-to-flowchart maker, and Spreadspeed, an auditing and productivity toolset for Microsoft Excel®.