Flowcharting in Excel Series
How to Insert Custom Graphics in Excel Diagrams
By Nicholas Hebb
Microsoft Excel contains 124 built-in symbols in most versions, with even more added starting in Excel 2007. These are sufficient for most flowcharts and other types of process flow diagrams, but there are times when additional symbols would be useful. This article shows one a way to automate adding custom graphics to your Excel diagrams.
This article will show how to create macros for automatically inserting the graphics and then how to create menu items to access the symbols quickly. Note, however, that this article covers creating macros and a custom menu. Creating custom ribbon items for Excel 2007 is more complex and beyond the scope of this article.
Excel Flowchart Wizard
FlowBreeze is a flowchart add-in for Microsoft Excel that makes creating flowcharts simple and pain free. Free 30-Day Trial.Create the Macros
- Create a directory for your graphics and store all the graphics files in it. Note: scroll down for an example on how to use Visio symbols for this.
- In Excel 2007 - 2019, click the Developer tab, then click the Visual Basic button. In Excel 2000-2003, go to Tools > Macro > Visual Basic Editor. For all versions, you can also open the Visual Basic Editor using the keyboard shortcut Alt-F11.
-
In the Visual Basic Editor (aka, VBE) right-click on PERSONAL.XLSB (.XLS in Excel 2000 - 2003) and select Insert > Module from the
context menu, as show in the picture below.

-
In the new module, add the following code:
Sub InsertPICTURE_NAMEPicture() ActiveSheet.Pictures.Insert("FILE_PATH\FILE_NAME").Select End Sub - Copy and rename the PICTURE_NAME and FILE_PATH\FILE_NAME sections of the code for each picture. Click the Save button and close the Visual Basic Editor.
Running the Macros
-
Open the macro dialog
- Excel 2007 - 2019: Click the Developer tab, then click the Macros button.
- Excel 2000 - 2003: Click Tools > Macros > Macro from the Excel menu.
- Select the macro to run from the list.
- Click the Run button.
Optionally, you can also create Quick Access Toolbar buttons (Excel 2007/2010) or custom menu items for each macro to shorten the number of steps required to run each.
A Special Tip for Visio Users
This section is for Visio users. It assumes that you have a valid license for Visio and aren't violating any Microsoft copyrights by copying the graphics from Visio to Excel.
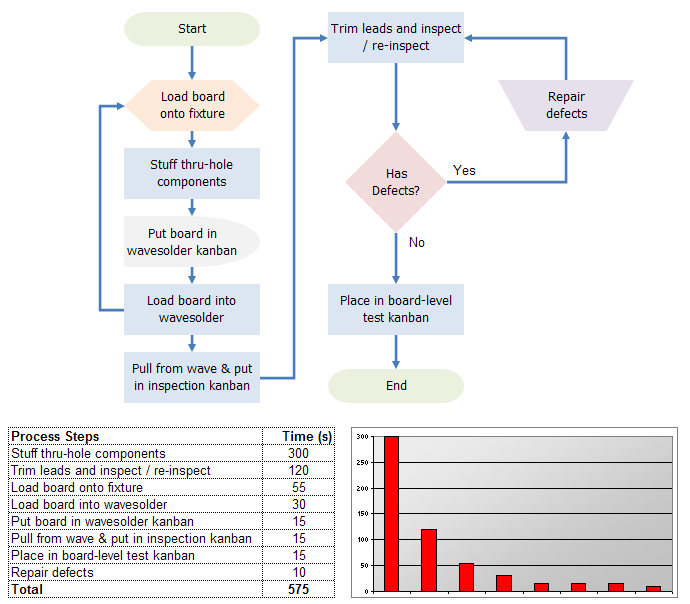
It may surprise some people, but many Visio users also like to use Excel to create diagrams. Obviously, Excel doesn't offer all the diagramming capabilities of Visio, but it does let other Office users edit and maintain the drawing without having to buy expensive, specialized software like Visio. Moreover, it offers one thing that Visio doesn't - the ability to combine data and graphs with diagrams.
To use Visio graphics in Excel, you can simply copy and paste them into Excel. But, then they are embedded as OLE Objects, which means they can be edited in Visio by double-clicking them. Otherwise they show up as pictures. But more to the point of this article, you would need to copy and paste them from Visio every time you wanted to use them in Excel. This trick gets around that hassle. So another way to use Visio graphics is to capture them as bitmaps, then import the Visio symbols into Excel as picture objects.
To do so, create a new drawing in Visio and drag all the desired shapes out onto the canvas. For each shape, copy it into Microsoft Paint (typically found under Accessories in your Start menu), then save each one as a PNG file (BMP format is another option, but GIF and JPG usually don't produce nice results).
Then you can use the technique described in steps 1-10, above, to automatically insert them into your Excel diagrams whenever you want.
About the Author
Nicholas Hebb
Nicholas Hebb is the owner and developer of BreezeTree Software, makers of FlowBreeze Flowchart Software, a text-to-flowchart maker, and Spreadspeed, an auditing and productivity toolset for Microsoft Excel®.