Create Custom Templates
The Template Generator automates the process of creating cross-functional, swim lane templates, but if you need more customization this section covers how to manually create your own templates.
FlowBreeze allows you to load custom templates via the Load Template toolbar button or at the start of a flowcharting session in the Start Flowcharting window. In addition to cross functional flowcharts (a.k.a. swim lane diagrams), you can also create simple templates for title blocks or block diagrams.
Step-by-step instructions
1. Create a grid.
2. Turn on Snap to Grid and Snap to Shape.
3. Set the page properties for paper size, orientation, and margins as desired via the Page Layout tab on the ribbon.
4. Type anything into a cell and do a print preview in Excel. Then close the print preview. This will display the page breaks, giving you a visual boundary for the template layout. Delete the entry you typed.
5. Get access to the Excel Drawing tools via the Insert tab. For the steps below, you will need to click the Shapes drop down while on the FlowBreeze tab.
6. Use a rectangle shape to add any title blocks to the diagram. Apply text formatting with the built-in formatting tools in Excel. If you wish to add swim lanes, add those beneath the title blocks.
Note: Keep a margin of one grid space between the title block and the left, right and bottom page break lines. The border lines will not display when printed if they are directly on the page break line.
7. Add any vertical lines for borders and swim lanes. Use the plain Line available from Excel's drawing tools.
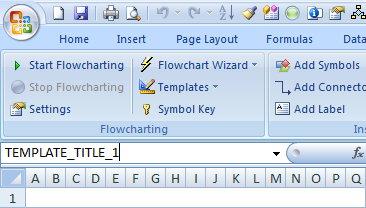
8. Rename all the shapes, so that each shape name starts with "TEMPLATE_". This is critical to integration with FlowBreeze because it will treat these shapes specially. To rename a shape, click on it, then rename it in the Name Box, as shown below. The picture shows the Excel 2007 Name Box, but it's in the same location in other versions of Excel.
Note that no two shapes can have the same name. This must be done for both shapes and lines.
9. Click Group > Group All Shapes from the FlowBreeze toolbar.
10. Repeat step 8 and name the grouped template shapes "TEMPLATE_GROUP".
11. Save as an Excel template file (i.e. an .xltx file type).