Flowcharting in Excel Series
Programming Excel 2007 - 2019 Shapes (AutoShapes) with VBA
By Nicholas Hebb
With the release of Office 2007, Microsoft rewrote the drawing tools from the ground up. On the plus side, this meant new shapes, new styles, and the addition of SmartArt. On the downside, they didn't have time to incorporate AutoShape operations in their macro recorder prior to release. Thankfully, Excel 2010 added macro support back, but like all macros the code generated is often bloated and relies heavily on the Selection object, which tends to hide the core objects in use. For the most part, the online help is good, but there is some information that doesn't get explained in detail. This article attempts to provide a basic overview of working with AutoShapes using VBA and touch on some areas that are not covered extensively in the help documentation.
Excel Flowchart Wizard
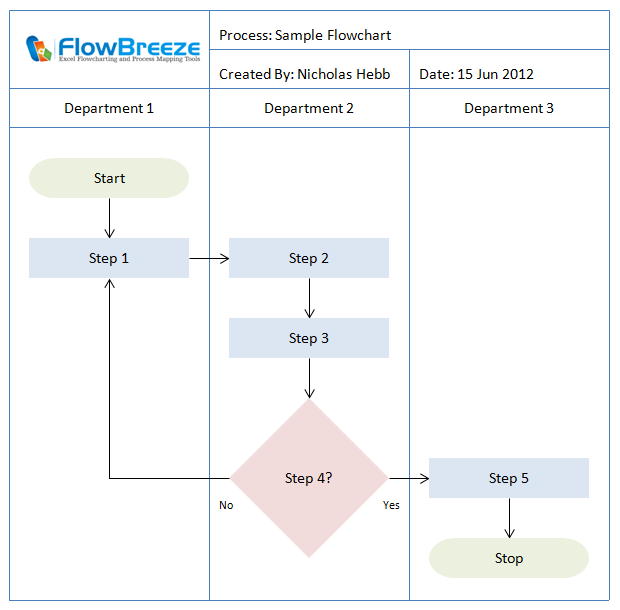
FlowBreeze is a flowchart add-in for Microsoft Excel that makes creating flowcharts simple and pain free. Free 30-Day Trial.Definitions
Two properties of the Shape object will be used in the code samples below - Shape.Type and Shape.AutoShapeType. Excel has a broad range of shape Types consisting not only of AutoShapes, but also connectors, lines, pictures, charts, comments, and many other graphical items. For AutoShapes, the AutoShapeType property lets you get/set the type of shape as shown in the gallery image below.

Knowing when to check the Shape.Type property versus the Shape.AutoShapeType is very useful. For example, if the AutoShapeType value is -2, then for all practical purposes the shape is not an AutoShape. If the value is greater than 1, then the shape is one of the types display in the Shapes gallery. The tricky part comes when the AutoShapeType is 1, which equals the AutoShape constant msoShapeRectangle. It could be a Rectangle AutoShape, but it could also be anything shaped like a rectangle, such as a text box, a comment, or even a picture. So if the AutoShapeType evaluates to 1, then you also need to check the Type property.
Callouts are another special type of shape that can cause confusion. They are discussed more in the Miscellaneous Issues section below.
Accessing a Shape Object
Each worksheet contains a Shapes collection consisting of Shape objects. Like other collections in VBA, the Shape object is accessed either via its name or index number, as in:
ActiveSheet.Shapes("SHAPE_NAME")
or
ActiveSheet.Shapes(1)
Or, using the For...Each syntax:
    Dim shp as Shape
    For Each shp in ActiveSheet.Shapes
        MsgBox shp.Name
    Next
Adding an AutoShape
The syntax for adding a shape is:
Worksheet.Shapes.AddShape(AutoShapeType, Left, Top, Width, Height)
The AutoShapeType is a constant that ranges from 1 to 137 for Excel 2003 and earlier versions. Excel 2007 added shapes 139 through 183. AutoShapeTypes 125-136 are special AutoShapes. The online help file states that they support mouse over and click events, but that only applies when they are used in PowerPoint presentations. You can use them in Excel but they don't have any special properties.
To see what the AutoShapeType constant is for each AutoShape, you can copy and paste the following code into the Excel Visual Basic Editor and run it (or download the sample file and run the macro). Not all the AutoShapes are available in the Shapes gallery, so this will also give you a look at some of the hidden ones.
Sub CreateAutoshapes()
    Dim i As Integer
    Dim t As Integer
    Dim shp As Shape
    dim ver as Integer

    t = 10
    For i = 1 To 137
        Set shp = ActiveSheet.Shapes.AddShape(i, 100, t, 60, 60)
        shp.TextFrame.Characters.Text = i
        t = t + 70
    Next
      ' skip 138 - not supported
    ver = GetXLVersion()
    If ver >= 12 Then
        For i = 139 To 183
            Set shp = ActiveSheet.Shapes.AddShape(i, 100, t, 60, 60)
            shp.TextFrame.Characters.Text = i
            t = t + 70
        Next
    End If
End Sub
Function GetXLVersion()
        GetXLVersion = CInt(Split(Replace$(Application.Version, ".", ","), ",")(0))
End Function
The Left, Top, Width, and Height parameters of AddShape() are specified in points. The origin is the top left corner of the worksheet, with the Left and Top values increasing to the right and down, respectively. Dealing with points on a worksheet isn't intuitive, so if you prefer you can add a shape to a given range address by using code like this:
Function AddShapeToRange(ShapeType As MsoAutoShapeType, sAddress As String) As Shape
    With ActiveSheet.Range(sAddress)
        Set AddShapeToRange = ActiveSheet.Shapes.AddShape(ShapeType, .Left, .Top, .Width, .Height)
    End With
End Function
Adding Text to an AutoShape
The Shape object has both a TextFrame and TextFrame2 members. The TextFrame2 member was added in Excel 2007 and gives better control over the formatting of the text. Because it is not backward compatible, I would recommend using the TextFrame object, as shown in the following code.
Sub AddFormattedTextToShape(oShape As Shape, sText As String)
    If Len(sText) > 0 Then
        With oShape.TextFrame
            .Characters.Text = sText
            .Characters.Font.Name = "Garamond"
            .Characters.Font.Size = 12
            .HorizontalAlignment = xlHAlignCenter
            .VerticalAlignment = xlVAlignCenter
        End With
    End If
End Sub
Setting Border and Fill Styles
If you take advantage of the built-in styles for Excel 2007 - 2019, setting the AutoShape formatting is ridiculously easy compared to Excel 2003 and previous versions. Excel 2007 introduced the ShapeStyle property with the 42 preset styles shown below.
The style numbers can be set using a simple line of code:
Shape.ShapeStyle = msoShapeStylePresetXX
Where Shape is the shape object and XX is the style number. The style numbers are shown in the image gallery in order from left to right, top to bottom. For example, the red button in the second row msoShapeStylePreset10).
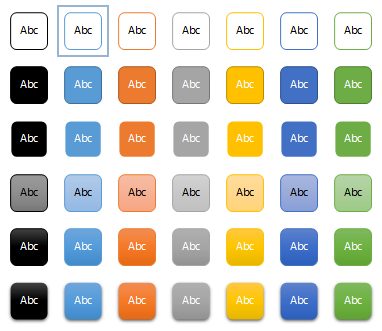
Default styles when using the Office theme in Excel 2013 - 2019.
Excel 2016 added additional styles (not pictured).
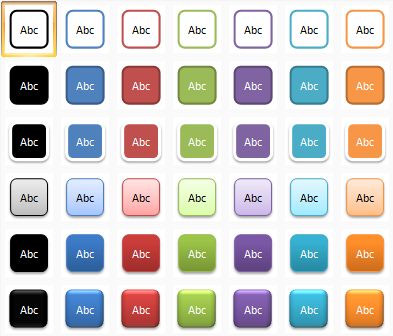
Default styles when using the Office theme in Excel 2007 - 2010.
Adding Connectors and Lines
Connectors and lines are different objects in Excel. Connectors are special lines that "connect" to shapes, and if the shape is moved the connector stays connected and reroutes accordingly. Connectors cannot connect to other connectors, but they can connect to the end point of a line.
The syntax for adding a line is straightforward:
Worksheet.Shapes.AddLine(BeginX, BeginY, EndX, EndY)
..with all coordinates as Singles. Adding a connector is a bit more complex, since you typically want it to connect two shapes. The code below calculates the begin and end points, creates the connector, attaches the connector to the two shapes, then finally does a reroute to ensure the shortest path.
Function AddConnectorBetweenShapes(ConnectorType As MsoConnectorType, _
                                   oBeginShape As Shape, _
                                   oEndShape As Shape) As Shape
    Const TOP_SIDE As Integer = 1
    Const BOTTOM_SIDE As Integer = 3
    Dim oConnector As Shape
    Dim x1 As Single
    Dim x2 As Single
    Dim y1 As Single
    Dim y2 As Single
    Dim ver as Integer
    With oBeginShape
        x1 = .Left + .Width / 2
        y1 = .Top + .Height
    End With

    With oEndShape
        x2 = .Left + .Width / 2
        y2 = .Top
    End With
    ver = GetXLVersion() ' referenced above
    If ver <= 12 Then
        x2 = x2 - x1
        y2 = y2 - y1
    End If
    Set oConnector = ActiveSheet.Shapes.AddConnector(ConnectorType, x1, y1, x2, y2)
    oConnector.ConnectorFormat.BeginConnect oBeginShape, BOTTOM_SIDE
    oConnector.ConnectorFormat.EndConnect oEndShape, TOP_SIDE
    oConnector.RerouteConnections


    Set AddConnectorBetweenShapes = oConnector
    Set oConnector = Nothing

End Function
Several points worth mentioning are:
- The ConnectorType can be one of three constants - msoConnectorCurve, msoConnectorElbow, or msoConnectorStraight.
- The calculations for the beginning and ending points are not normally needed. You could put any values in for the AddConnector() function because once you call BeginConnect and EndConnect, the connector is attached to the shapes and the begin and end points get set automatically.
- How the end coordinates are specified is not consistent between Excel versions. Prior to Excel 2007, the end coordinates were relative to the begin coordinates. Starting in Excel 2007, the function now uses absolute coordinates.
- When you route a Connector to an AutoShape, you need to specify the side using a connection site constant. The constants are different for each AutoShape type, but generally they start with the top side = 1 and go counter-clockwise. For example, most rectangular shapes have connection site constants where top = 1, left = 2, bottom = 3, and right = 4.
- When you call the RerouteConnections() function, it sets the connection sides automatically in order to create the shortest path between the two shapes. So, unless you want a specific routing, you can get usually just guess at the connection site values then call RerouteConnections().
Formatting Connectors and Lines
Like AutoShapes, formatting Connectors and Lines is fairly straightforward in Excel 2007 - 2019. Here is a comparison of two formatting routines for older versions of Excel versus the newer versions:
Sub FormatConnector2003(oConnector As Shape)
        With oConnector
            If .Connector Or .Type = msoLine Then
      ' rough approximation of the Excel 2007 preset line style #17
                .Line.EndArrowheadStyle = msoArrowheadTriangle
                .Line.Weight = 2
                .Line.ForeColor.RGB = RGB(192, 80, 77)
                .Shadow.Type = msoShadow6
                .Shadow.IncrementOffsetX -4.5
                .Shadow.IncrementOffsetY -4.5
                .Shadow.ForeColor.RGB = RGB(192, 192, 192)
                .Shadow.Transparency = 0.5
                .Visible = msoTrue
            End If
        End With
End Sub
Sub FormatConnector2007(oConnector As Shape)
    With oConnector
        If .Connector Or .Type = msoLine Then
            .Line.EndArrowheadStyle = msoArrowheadTriangle
            .ShapeStyle = msoLineStylePreset17
        End If
    End With
End Sub
The Connector property, used above, returns a Boolean indicating whether the shape is a connector. The Type = msoLine statement checks if the shape is a line. In this case the code will format both connectors and lines the same way, but at times you may want handle them separately. (NB: The Insert Shapes gallery of Excel 2007 only lets you add Connectors, not Lines. So unless you are dealing with legacy files or add Lines via code, testing Type = msoLine may never be an issue for you.)
Like the shape styles, you can format the line style by setting the ShapeStyle to one of the msoLineStylePresetXX values, where XX matches the order they appear in the style gallery (below) from left to right, top to bottom. Note: Excel 2016 added additional styles not shown in the image below. If you use the msoLineStylePreset values for those in your code, be aware that your code will not be compatible with previous versions of Excel.
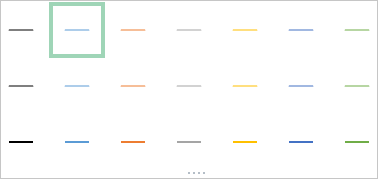
Excel 2003 - 2019 Line Styles
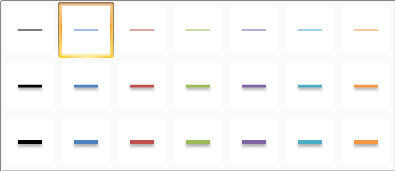
Excel 2007 - 2010 Line Styles
The Line object has several other members worth mentioning. In addition to the EndArrowheadStyle shown above, there is a corresponding BeginArrowheadStyle property, a DashStyle property, and also a Style property that lets you create double lines.
Miscellaneous Issues
Here are a few Excel 2007 issues with AutoShapes that are good to be aware of :
- If you copy a set of shapes, older versions of Office gave the option to Paste Special as editable AutoShapes in other Office applications. This option no longer exists in Office 2007 and later.
- In Excel 2007 - 2013, changing the AutoShape type will disconnect any incoming or outgoing Connectors to a shape.
- Some print drivers (including PDF export handlers) do not handle printing thick Connectors well, e.g., elbow connectors may straighten. If this happens, either change the line thickness or try grouping all the shapes together prior to printing.
- The Arc is an AutoShape but needs to be treated as a line when setting the ShapeStyle property.
- Most of the styles are backward compatible except for styles 37-42 (the glossy button look in the bottom row of the style gallery). Styles 31-36 (the second row from bottom) do not render very well in Excel 2000.
- You can add Callouts using the AddShape() or AddCallout() methods, but the AddCallout() method will only let you add four types, two of which are actually the same. Callouts have AutoShapeType values in the range of 105-124. Even though they have AutoShapeType values, the Shape.Type property will return msoCallout - not msoAutoShape. Confused? Wait, there's more. The callouts with AutoShapeTypes from 105-108 actually return a Shape.Type = msoAutoShape - not msoCallout.
Sample File
The sample file includes three demo sheets. The ShapeDemo sheet contains a macro to add two shapes, format them, then add a connector and format it. The Animation sheet has a simple macro showing how to move a shape around the sheet. The CreateAutoShapes sheet has a macro to create all AutoShapes available in your version of Excel.
The ShapeDemo routine has two function calls that are commented out - IlluminateShapeText2003() and IlluminateShapeText2007(). These subs add some gaudy formatting to the first letter of each text block, but they serve to highlight some of the differences between Excel 2007 and previous versions. Two parts of the code worth looking at are the HasText property and the formatting properties of TextFrame2. With the old TextFrame object, you would have to try accessing the TextFrame.Characters.Count property, which throws an error if no text exists. As for the formatting, the font colors in Excel 2003 and previous were limited to the colors in the pallet. In Excel 2007 and later, you can add reflections, drop shadows, and glow as well as set the color to whatever RGB value your heart desires.
Lastly, there is a module MCommon containing a sub that deletes all the AutoShapes on a sheet. In order not to delete the command buttons on the sheet (which are shapes too), it creates a ShapeRange of the AutoShapes and deletes that. The online help file shows the syntax for creating a ShapeRange when you know the names of the shapes at design time, but the syntax is a bit tricky when creating one dynamically. The DeleteAllAutoShapes() sub in the sample file shows you how to do this.
About the Author
Nicholas Hebb
Nicholas Hebb is the owner and developer of BreezeTree Software, makers of FlowBreeze Flowchart Software, a text-to-flowchart maker, and Spreadspeed, an auditing and productivity toolset for Microsoft Excel®.