Inserting Symbols
After you've completed your flowchart, sometimes there's the need to go back and edit the flowchart, adding additional symbols. There are two ways to do this - using FlowBreeze's text-to-flowchart automation or via the toolbar.
Creating Space for the New Symbol
Inserting new flowchart symbols is essentially the same process as deleting flowchart symbols - just in reverse. As with a Delete operation, we select the range of cells to perform the insert on. Again, the range is selected so that the cell shifting effects the other flowchart symbols in the desired way. In the example in Picture 1, we want to shift the symbols in both the Dept 2 and Dept 3 swim lanes, so we select a range wide enough to encompass the symbols in both lanes. The height of the range selection allows for a new symbol that is the same height as the Step 3 symbol, but if you want to add a symbol that requires more vertical space, you should select a taller range.
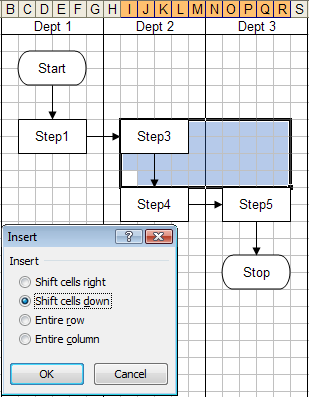
Picture 1
After the cell insert, the symbols have shifted along with the cells and a space has been opened up to place the new flowchart symbol, as shown in Picture 2.
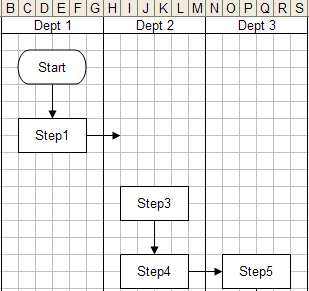
Picture 2
Inserting the Symbol
Method 1 - via Add Symbols and Add Connectors dialogs (Recommended)
See the Add Symbols and Add Connector sections for details on using these tools.
Method 2 - Text-To-Flowchart
- Click the "Start" button on the FlowBreeze ribbon tab.
- Type the text for the symbol in the location you want the symbol to appear, and hit Enter.
- Most likely, you will be prompted to add a flow line from a neighboring symbol. If applicable, select the symbol to route a flow line from and click OK.
- If needed, type "FL" in a nearby cell to bring up the Add Connector dialog. Select the new symbol and a symbol to route another flow line to, then click OK.
- Click the Stop Flowcharting button on the FlowBreeze toolbar.
Method 3 - via FlowBreeze Ribbon
- Click the Insert tab on the main Excel ribbon.
- Click on the desired symbol from the Shapes drop down gallery.
- Click the sheet to place the symbol.
- Add text as desired.
- Change the styling to match other symbols, as needed.
Picture 3 shows a simple example of the a new flowchart symbol that has been added. If you used Method 1 above, then the flow line connectors can be added automatically. If you used Methods 2 or 3, then you will need to insert them manually via the toolbar.
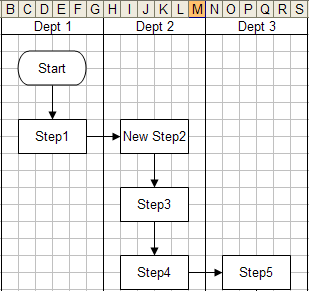
Picture 3