Excel Drawing Tutorial
How to Create Spaghetti Diagrams with Excel
By Nicholas Hebb
What is a Spaghetti Diagram (aka, Spaghetti Chart)?
A spaghetti diagram is a roughly scaled layout of a work area that shows the path taken by a person, material, or information (often paperwork) as moves through a process. The name "spaghetti" comes from the fact that real world paths are not straight lines. They bend, crisscross, and go back-and-forth between two stations, so the final drawing can look quite messy.
Spaghetti diagrams have two common uses. The first is in 5S / Lean where the path of a worker is diagrammed, usually in a single work area. Diagramming the path of the worker is a simple technique to visualize how organized the work area is.
The second common usage is tracing the path of material or paperwork throughout a work area or an entire plant. This shows the inefficiency in a process. It can thus be used to plan workarea re-layouts to improve efficency by reducing travel distances between sucessive stations.
Excel Flowchart Wizard
FlowBreeze is a flowchart add-in for Microsoft Excel that makes creating flowcharts simple and pain free. Free 30-Day Trial.How to Use Excel with Spaghetti Diagrams
This article has two primary objectives:
- Showing you how to use Excel to create a layout of your workarea.
- Providing tips for documenting the spaghetti diagram after the fact, in case you want an electronic record.
Drawing the paths for spaghetti diagrams is strictly a manual process. It has to be done in the work area as the actions are being performed. However, Excel is really helpful if you don't have a CAD layout of the area. Plus, Excel always comes in handy if you want to perform analysis on the time data gathered. You can use Excel to create the layout by following the steps below.
Part 1 - Create the Work Area Layout
A high-level overview of the process consists of the following steps:
- Hand draw a rough layout of the workarea, complete with all equipment.
- Create a grid on a worksheet (see instructions below).
- Based on the measurements and the printable worksheet size, decide on a scale, e.g., 1 grid square = 1 ft, 1 m, etc.
- Turn on Snap to Grid (Page layout tab > Align > Snap to Grid).
-
Add autoshapes to the worksheet to respresent the equipment:
- Click the Insert tab and use the Shapes drop down gallery to insert a rectangle shape.
- Click on the shape to activate the Format tab.
- Change the style to a black outline with a white fill color.
- Click Shape Outline and change the line weight to 0.75.
- Click the Home tab and set the font color to black and the font size to something small like 8 pt.
- Copy and paste the shape a bunch of times to generate a set of shapes to represent the equipment and workstations.
- Resize the shapes and drag them into place according to the rough layout that you created in step 1.
- Click on the shapes and add text labels to ID the equipment. If the space is too limited, you can number them instead and create a legend off to the side.
- Print out the worksheet with the layout.
- Measure the work area, including the locations and dimensions of all workstations, equipment, and path obstacles and write them on the worksheet.
- Use the measurements to fine tune the Excel layout, adjusting equipment sizes and locations where needed.
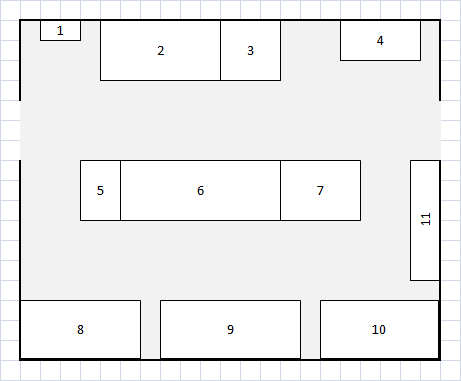
Sample workarea layout prior to recording paths
You now have a re-usable layout that you can use for creating spaghetti diagrams. Based on personal experience, I've found that this is a cheap and easy way to experiment with ideas if you ever need to need to do a re-layout of a workarea. My initial attempts used cells shading and borders to mark equipment locations, but I found that I would constantly have to redraw borders when adjacent areas are moved to relayout the area. Shapes don't have this issue.
Creating a Grid in Excel
You can create a grid in Excel by setting all the column widths to 2.14, which will make te column width equal to the standard row height. This assumes that you are using the standard theme with a font of Calibri 11pt. If you are using a different font, follow the steps shown in the images below to set the column width to match the row height in pixels.
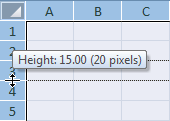
Click between rows to see height
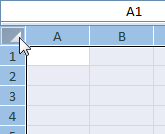
Select all cells

Set column width (in pixels)
Part 2 - Record Add the Spaghetti Lines
Print it out the final worksheet with the layout. Everytime the worker, material, or information (e.g., paperwork) moves, record the amount of time it takes and draw the actual path on the sheet, leaving nothing out. If you are documenting multiple flows on one sheet, use a different color to indicate each type of flow (people, product, or paper). After a while the diagram may look like a scribbled mess. That's fine.
Part 3 - Documenting The Results
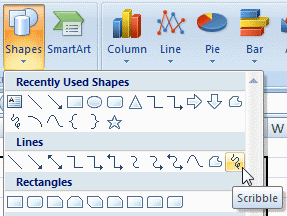
Scribble tool: Excel features a scribble tool that lets you draw free hand lines, which are good for documenting the paths, as long as you have a steady hand. The scribble tool is location in the Shape gallery on the Insert tab, as shown in the image below.
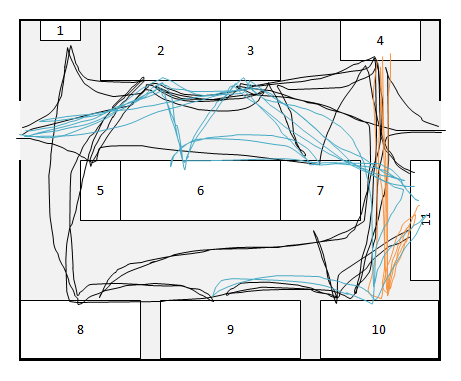
After each scribble set is done, you can select it and apply line styling to color each path type (people, product, paper) a different color. Here is a sample rendering off a set of paths traced with the scribble tool:
Brainstorming Improvements

Once the inefficiencies are visually apparent, your team can brainstorm possible improvements. These can be marked on the diagram with kaizen bursts. You can create a kaizen burst using the "Explosion 1" or "Explosion 2" shapes available from the Insert > Shapes gallery, and then setting the fill color to yellow, the border to 0.75 black, and the font to black, as shown to the right.
About the Author
Nicholas Hebb
Nicholas Hebb is the owner and developer of BreezeTree Software, makers of FlowBreeze Flowchart Software, a text-to-flowchart maker, and Spreadspeed, an auditing and productivity toolset for Microsoft Excel®.