Flowcharting in Excel Series
Copy an Excel Flowchart To Word
By Nicholas Hebb
Excel Flowchart Copy / Paste Options
Do you want to be able to edit the copied flowchart?
When you want to export a flowchart from Excel (such as to Microsoft Word for process documentation or ISO work instructions), you have 2 options: (1) you can copy/paste the flowchart as a Microsoft Office drawing object, or (2) copy/paste the flowchart as a picture. This article covers copying and pasting flowcharts as Drawing Objects. Pasting a flowchart as a drawing object lets you edit in in another Microsoft Office application (typically Word). Pasting it as a picture doesn't (thereby protecting your flowchart from being altered). To read about copying flowcharts as pictures, see the article: Making Flowcharts in Excel: How to Copy Flowcharts as Pictures.
Excel Flowchart Wizard
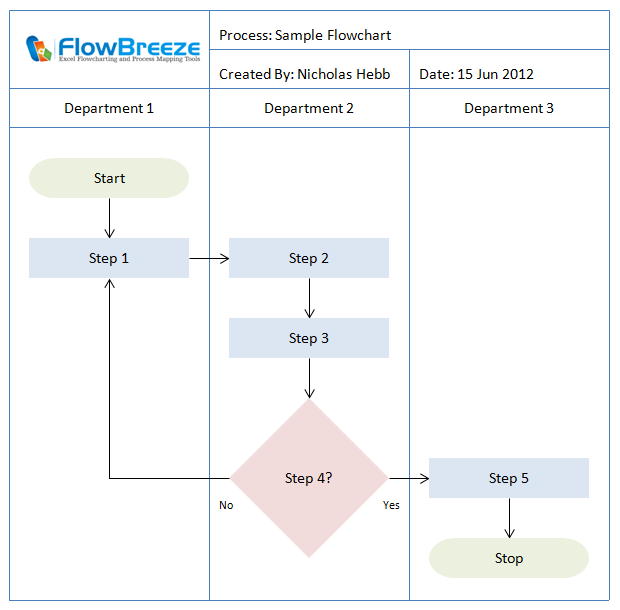
FlowBreeze is a flowchart add-in for Microsoft Excel that makes creating flowcharts simple and pain free. Free 30-Day Trial.Pasting Flowcharts with Style - Word Styles, that is...
The following three sections cover tricks to watch out for when pasting a flowchart into Microsoft Word.
Page Margins
As covered in this article on setting page margins for export, Excel has default left and right margins of 0.75", whereas Word has default margins of 1.25". This gives Word a 1" narrower working area, cutting off wide flowcharts created in Excel.
To accomodate this, you can either change the margins in Excel (giving you a smaller working area) or change them in Word. Typically, I make the changes in Excel prior to flowcharting and stay within the narrower boundaries.
Selecting Just The Objects
If you just select the worksheet or highlight cells and copy those into Word, you will end up getting the grid (Excel worksheet cells) pasted into Word along with the flowchart.
To select just the flowchart and other Excel drawing objects, use the Select Multiple Objects
 toolbar button. This button is available on the FlowBreeze toolbar, but for non-FlowBreeze users it may be added
by customizing the Drawing toolbar. It allows you to select all the the shapes once via a easy to use selection
window.
toolbar button. This button is available on the FlowBreeze toolbar, but for non-FlowBreeze users it may be added
by customizing the Drawing toolbar. It allows you to select all the the shapes once via a easy to use selection
window.
After you have selected the shapes, it's a good idea to Group the shapes into a single shape. This can be done via the Group button on the FlowBreeze toolbar or on the built-in Drawing toolbar by selecting Draw > Group. Right-click on the new grouoed shape and select Copy from the menu. Move over into Word and simply paste the drawing.
Formatting Flowcharts using Microsoft Word Styles
Using the default Copy/Paste operations, Microsoft Word will paste the flowchart as a drawing object. The upside is that you can edit the flowchart natively in Word. The downside is that you lose your text formatting that you set in Excel.
By default, Word applies the Normal style to the text format in the symbol (aka, Autoshape). To rectify this in Word, select a flowchart symbol then select Format > Styles and Formatting from the menu. Then select Add New Style. I typically name the style Flowchart. With the new style, edit the font and text alignment properties to your liking. [Tahoma produces very readable text at small fonts, as does the Segoe UI font used in Office 2007.]
Here's the drag: to apply the style, you will need to select each flowchart symbol and then click on the style name (the method for selecting the style name differs by Word versions - check your Word help file for reference).
One note: If you had your text vertically centered in the flowchart symbol in Excel, you will lose this capability in Word. The only way to do this is to put all the symbols in a table, then set the vertical text alignment for each table cell. This is too cumbersome for practical use, though.
Lastly, if you want to add new flowchart symbols with the same styling, make sure you select one of the flowchart shapes, right-click on it, then select Set Autoshape Defaults from the context menu. This ensures that future flowchart symbols will be created with he same style.
About the Author
Nicholas Hebb
Nicholas Hebb is the owner and developer of BreezeTree Software, makers of FlowBreeze Flowchart Software, a text-to-flowchart maker, and Spreadspeed, an auditing and productivity toolset for Microsoft Excel®.